Tuesday, May 31, 2011

Tasty Tuesday


Finally! A new Tasty Tuesday. I know this series has been hit and miss with consistency lately, and I sincerely apologize. My home life should be evening out a bit and hopefully I will be able to get back to posting something new every Tuesday. 

This week we are making...


Crispy Oven Fried Chicken courtesy of Tasty Kitchen


The ingredients you will need are:
  • 3 lbs. chicken
  • 1 tbsp. Olive Oil
  • 2 tsp. Kosher salt
  • 1 tsp. black pepper
  • 1 1/2 cup flour

I love this chicken. I like to buy as much organic and natural food as possible and I love this chicken that comes from right here in Ohio. The cute cartoon chicken on the package doesn't hurt. He doesn't know the fate that all these chickens are meeting probably. 

Preheat your oven to 400 degrees.


You will first want to rinse off all the chicken and pat dry. 


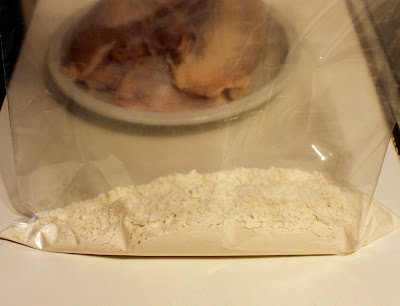
Now to get ready for the oven. First, I find it easiest to place your flour in a large ziplock bag. 


You will want to sprinkle the salt and pepper over all your chicken pieces and drizzle it all with olive oil. I just drizzled it all over the chicken and then tossed them all together to make sure all the pieces were covered. 

You will then want to drop a piece of chicken in your bag of flour, just one at at time, and shake to make sure it is evenly coated. Shake off excess flour and place on a baking sheet.


This is what they should look like right before you pop them in the oven.

About 30 minutes into cooking (it should cook about 45-55 minutes total), you will want to use a basting brush and brush each of the pieces of chicken with the drippings from the bottom of the pan or you can just turn them over. I did both.

The chicken should come out golden and crispy, just like if you had fried them the old fashioned way!

They were a hit with my not-a-huge-chicken-eater husband, so that speaks volumes of to me. The next time you are in the mood for fried chicken but don't want to go through all the actual frying (and want something a little less greasy), I recommend giving this one a try!

Peace out *g*


Monday, May 30, 2011

Happy Memorial Day

Today in the US is Memorial Day. A time to recognize and give thanks to those that have served in our country's military to help and protect our freedom.

Neither my husband or myself served in the military, but we both come from families that have. Both our fathers did. His was in the Army (a lifetime in the Army Reserves, just retiring in the last couple years) and my dad in the Navy. We also both had grandparents and several other family members (both male AND female) defend this great country.

I just wanted to take a moment and say thank you to all those who are currently serving or have in the past. The sacrifices you make to keep us all safe will never go unappreciated.

Check back tomorrow for a brand new (finally!) Tasty Tuesday post and hopefully getting things back on track around here.

Peace out *g*

Monday, May 23, 2011

Two Crazy Dachshunds

A few weeks ago, the husband and I were recruited to dog sit my in-laws dog while they were away on vacation. They have a miniature dachshund name Barkley, who is just a year and a couple months younger than our own little miniature dachshund Dallas. The two have been around each other since Barkley went to live with my in-laws, so they are pretty good friends.

They have never spent this much time together though and the afternoon we were getting ready to take Barkley home, they decided to have one last drag-out play fight. To be honest, they really didn't horse around as much as I thought they would during the week, so I took advantage of our last few hours with our house guest to get some pretty funny pictures. Enjoy!

This is our guy Dallas


This was our house guest Barkley


And then the battle royale began...


I had a lot more pictures, but boy those dachshunds are fast, and they ended up pretty blurry.

When all was said and down, they were some pretty tired pups.


Peace out *g*

Tuesday, May 17, 2011

Something Different for Tasty Tuesday

So, no Tasty Tuesday this week. Hopefully things will be back on track next week and I will have a new post. My husband's schedule goes back to normal and mine will hopefully even out as well.

Anyways, it's okay because I do have something to share. My husband has recently started a movie blog, Movies Hate You Too. He reviews new movies in theaters, new movies out on Blu Ray, posts about items coming and going from Netflix, deals on Blu Rays, and general movie news.


I would love it (and he would appreciate it too), if you just hopped on over and checked it out. You can also follow him on Twitter or like him over at Facebook.

Check back next Tuesday for a new Tasty Tuesday!

Peace out *g*

Monday, May 16, 2011

Belated and Early Birthday Fun

I have two good friends I work with at my local scrapbook store and all of our birthdays are generally close together. Well, me and my one friend both have ours in March and our other friend happens to have hers in May. Tomorrow to be exact.

We decided we wanted to have a fun cropping-filled day to celebrate all of our birthdays and we picked a day kind of in between all of our birthdays. This year we did it on the last Saturday of April. 

We scrapbooked for a while, had lunch, and then decided to exchange gifts.


Kai and Tim. She LOVES Tim Holtz and Emily got her the perfect gift. 


Emily got a tool kit for her Cricut and some Cartridges that showed up during the day. Kai's kids were nice enough to bring it up for her.


I got this lovely plaque from Kai for my birthday and Emily got me a cupcake cookbook and this awesome cupcake pan from Avon. It's on backorder, so I don't have it yet, but I can't wait! I was lame and didn't have either of their gifts, but we are having another cropping weekend this weekend and plan on giving them their gifts then. I'd tell you what they were, but then they would know too, and that would ruin the surprise!


Look at all that. This was our setup, my table being the one closest. 


Little doggies I was cutting out for a page I made, which I still have to share here sometime. Come to think of it, I haven't shared any pages I have made here. Granted, up until this birthday cropping extravaganza, I hadn't scrapbooked since the Fall retreat I went on in November (which I also never blogged about).

Okay, before I depress myself any further about all the things I have neglected to share, I am gonna go. Hope everyone has a wonderful week ahead!

Peace out *g*


Wednesday, May 11, 2011

Paper Flowers for when the Rain Won't Stop

Have you joined the masses that are on Pinterest? I did recently and I must admit, I am HOOKED! Not only is it a great resource to share wonderful ideas and images with your friends, but it's also been a wonderful resource for new blogs and websites for me to check out.

Recently, I found and repinned the following image...


There was a link to Scrapbooks Etc. which had a tutorial on how to make all the wonderful paper flowers shown above! I have been on a huge flower kick recently and I thought the Mother's Day cards I needed to make would be the perfect opportunity to try and make one of these.

I decided to make the scalloped puff flower and to begin, you will need to cut 5 scalloped circles.


I cut six, just because I wasn't sure.


You will then want to soak the flowers in water for a few minutes each.


You will then want to lay them out on a paper towel a pat off any extra water.


You will then want to stack them on top of each other and place a brad through the middle. I used a flower shaped pink brad. I tried a smaller round one but the paper was fragile from being wet and just ripped right through. (I also neglected to take a photos of this before I went on to the next step).

You will then want to start with the top layer and scrunch up the sides. Repeat with each layer until you get the shape and look you like.


Once you are done, let it dry completely, which for mine was about 12 hours. When it is done, this is what you will have...


I am very happy with how it turned out and can't wait to try it out the other two types of flowers in the tutorial! 

Now that I had my flower done, I was able to complete the Mother's Day card I made for my mother-in-law.


I hope everyone likes the flowers and gives them a try. If you do, please share a link to a photo in the comments section or leave a comment on how it went!

Oh, and if you are on Pinterest, you can follow me here and I will follow you back. If you are interested in it and want to sign up, leave a comment and I will send you an invite.

Peace out *g*


Tuesday, May 10, 2011

Tasty Tuesday


So, this weeks Tasty Tuesday is another simple, I-don't-even-want-to-think-about-dinner recipe, courtesy of the fine folks at Velveeta. Between me working a second job a few nights a week to help out a friend,  going to the gym and the husbands new, inconvenient (but thankfully temporary) schedule, we get home much later and want something easy, quick and good. Emphasis on the good. 

Before the husband and I moved in together, I never really had Velveeta cheese. Sure, once in a while my mom would splurge and by Velveeta shells and cheese, but that was as close as it got. So, when I found out that it was pretty much what my husband had grown up on, I knew that I would have to make friends with it, and fast!

We recently picked up a cookbook that was all Velveeta cheese recipes and this recipe jumped out at both of us, Velveeta Salsa Joe Sandwich.


Ingredients
  • 1 lb. ground beef/turkey
  • 1 cup salsa
  • 6 oz of Velveeta cheese

You will want to start by browning your meat. I used ground turkey. Drain off any excess fat and put back in the pan.


Add in the cheese and salsa and cook over medium-low heat until the Velveeta is melted. 


And this is what you'll have! It might not look great, but it tastes wonderful. You can have it on sandwich buns or in tortilla's or even over nacho chips! Best of all, it is super fast, anyone will find the time to whip this together. 

Hope everyone is having a nice week and make sure to check back tomorrow to see the flower tutorial from the Mothers Day card I posted about yesterday. 

Peace out *g*


Monday, May 9, 2011

A Day for the Moms


It was a rare Mother's Day this year, in the fact that my husband and I would get to see both our moms. My mother-in-law lives out of town, so in years past it was either stay home and celebrate with my mom, or go out of town to celebrate with his.

This year, we were dog-sitting (post about THAT later this week) for my husbands parents while they were out of town. We had to go and meet up with them to return their dog and have a quick bite to eat, which would give us a chance to give her a card in person. Earlier in the day, before my own mom had to go to work, I went over to give her a card and wish her a Happy Mother's Day.

With the way life has been recently around here (a major reason I didn't post at all last week), I hadn't made any cards recently. I was feeling creative though and making the two cards was just the kick-in-the-pants I needed to get my creative juices flowing again.

The first card is the one I made for my Mom.


This next card is the one I made for my Mother-In-Law.


Stay tuned, as I will have a tutorial on Wednesday this week about how to make the flower on the card above. Trust me, you'll want to check it out!

I hope all the Mom's out there had a wonderful Mothers Day and everyone have a good week!

Peace out *g*